If your campaign needs funds to be paid to an international bank account, the process is slightly different from a local payout. While it does take a bit more time and admin, we’re here to guide you every step of the way.
This guide explains how international payouts work for both Blue Tick campaigns and To Owner campaigns, what documents you’ll need, and what to expect along the way.
International Payouts for Blue Tick Campaigns
Blue Tick campaigns work a little differently to To Owner campaigns. The key thing to remember is this:
Blue Tick campaigns are verified at payout stage, not at campaign creation.
Step 1: Request a payout
When you’re ready to access funds, log into your campaign dashboard and submit a payout request.
Step 2: Enter beneficiary banking details
For Blue Tick campaigns, the beneficiary must be an organisation, not a personal bank account.
Examples of acceptable beneficiaries include:
A hospital or medical practice
A doctor or specialist
A school or university
A registered organisation or service provider
You’ll need to upload:
Proof of bank account (for the organisation)
An invoice or quote
You may submit the same invoice more than once, as long as it clearly shows:
The organisation’s name
Their bank account details
Step 3: Submit and notify us
Once you’ve submitted the payout request:
Email [email protected] Let us know:
You’ve submitted a payout request
It’s for a Blue Tick campaign
You need the funds paid to an international bank account
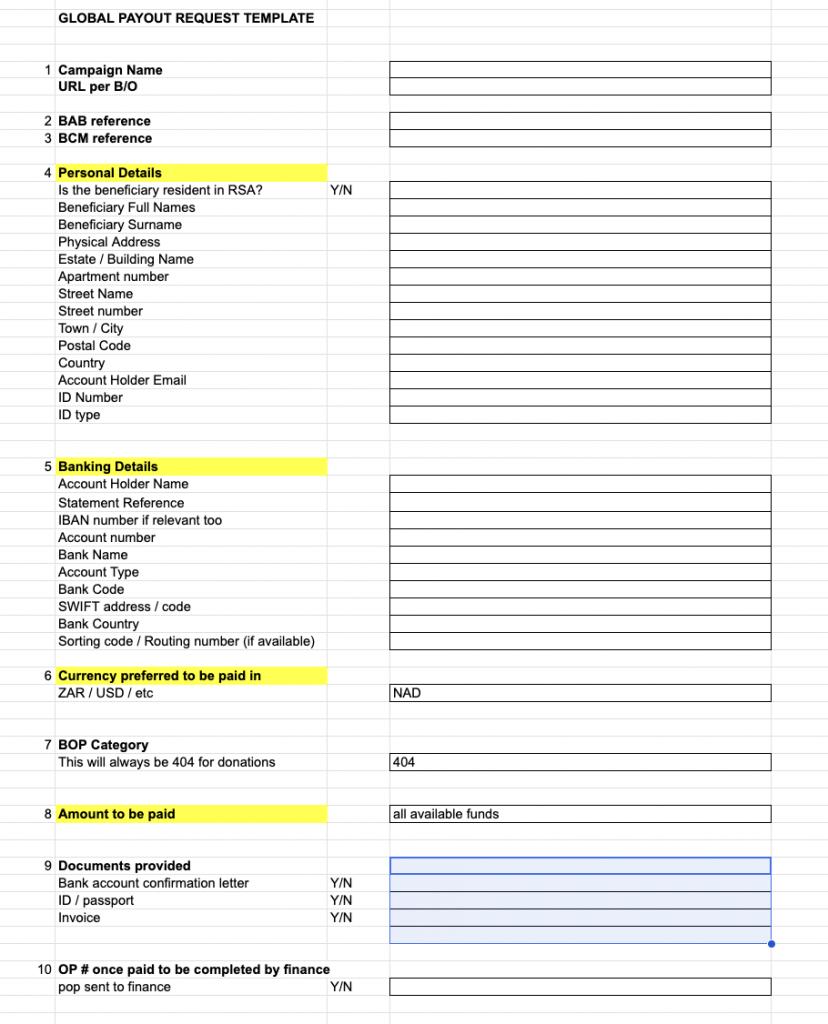
Step 4: Complete the Global Payout Form
Our team will send you a Global Payout Form
Please fill this form in carefully and in full.
Important notes:
Next to Amount to be Paid, make sure you enter either all available funds or the exact amount you want paid
International payouts are manual
You must submit a new Global Payout Form for every payout request
Once completed, send the form back to us (or to your campaign manager).
Step 5: Processing & timelines
After we receive the form:
We submit it to our finance team
The payout is processed manually
International payouts take longer than local payouts While timelines can vary, we recommend allowing 2–4 weeks for a successful international transfer.
International Payouts for Self-Managed Campaigns
Self-managed campaigns pay funds into a personal bank account, but there are a few important things to note for international payouts.
Before anything else:
Your campaign must receive at least one successful donation before it can be verified.
Step 1: Upload verification documents
When you’re ready, upload the following to your campaign under the verification tab:
Campaign creator’s ID
Supporting documents (e.g. invoice, quote, or formal proof showing how donations will be used)
We know this process can feel overwhelming, especially when funds are urgently needed. Thank you for your patience, and for the important work you’re doing through your campaign.
At BackaBuddy, we want your fundraising experience to be as smooth as possible—including getting your funds out when you need them! Whether you’re running a self-managed campaign or a Blue Tick campaign, here’s a simple, step-by-step guide to help you request a payout, plus tips for a hassle-free process.
Before You Request a Payout
For Self-Managed Campaigns
Before you can request a payout, your campaign must be verified by the BackaBuddy team. This means:
Upload all required documents for verification.
Wait for your campaign to be checked by the BackaBuddy team.
Once verified, a BackaBuddy Verified Badge will appear on your campaign page, and the “Payout Request” button will turn purple and become available.
Tip: If you see the “Payout Request” button greyed out, double-check your documents and make sure your campaign has been fully verified!
Blue Tick campaigns (where donations are paid directly to an organisation or service provider) do not require campaign verification before requesting a payout.
How to Request a Payout
Steps 1–9 (For Both Self-Managed & Blue Tick Campaigns)
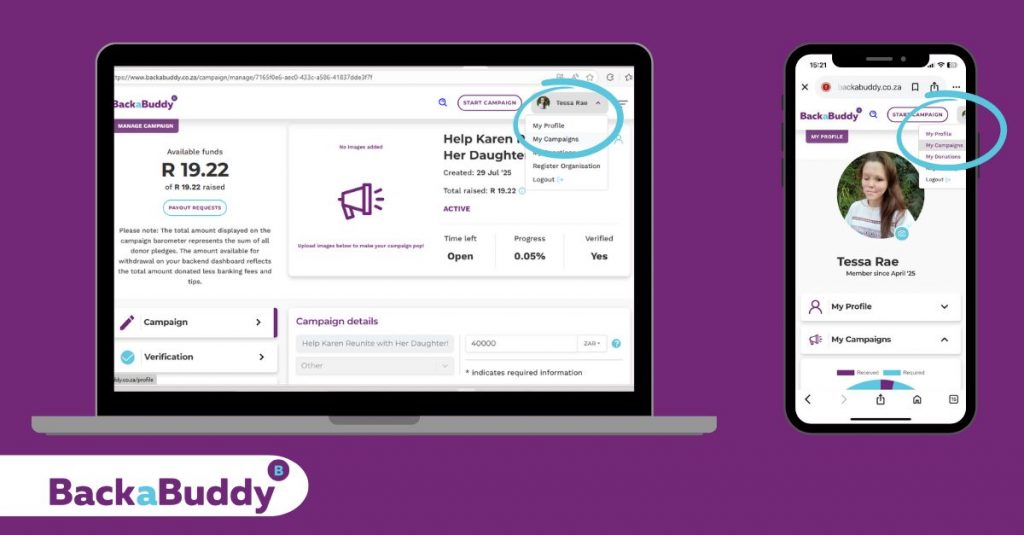
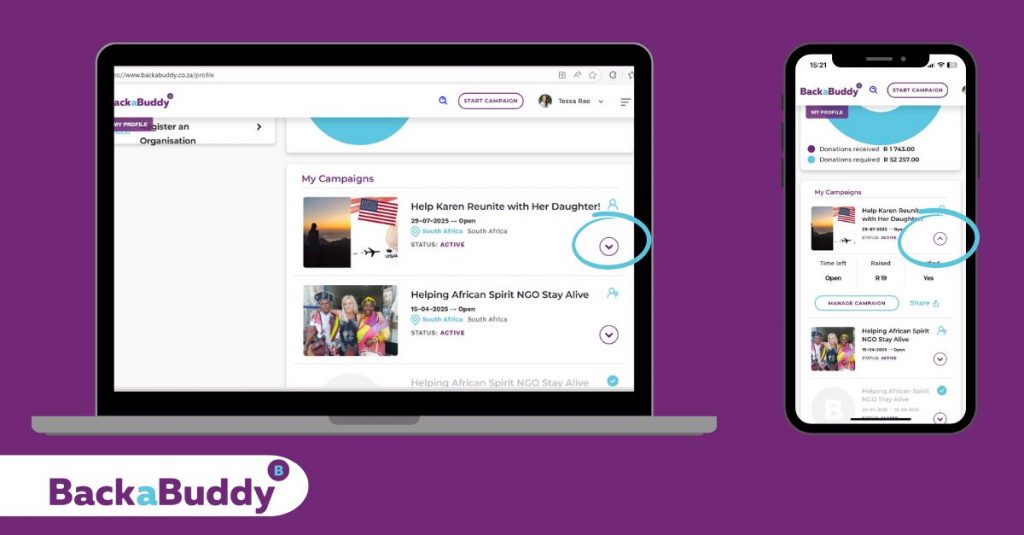
Hover over your profile name (top right-hand corner).
Select “My Campaigns” from the dropdown.
Scroll down to find your campaign’s banner and title, below the donation summary circle.
On the right, click the purple circle with a purple dropdown arrow.
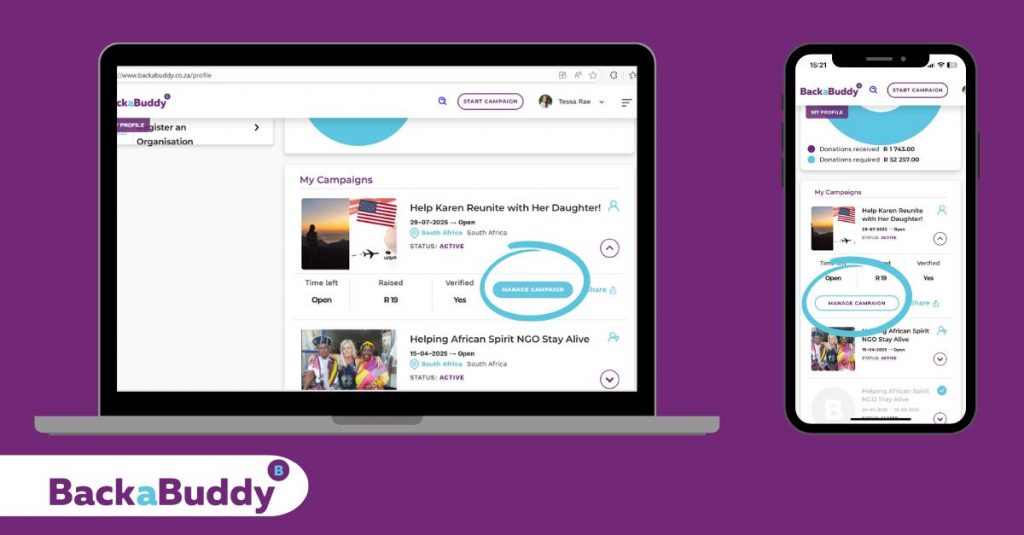
Click on “Manage Campaign”.
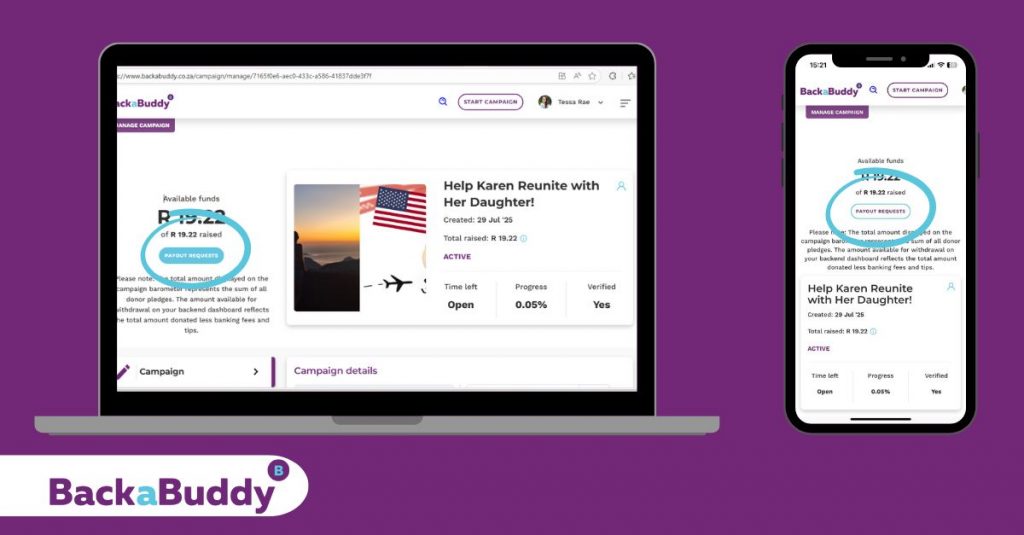
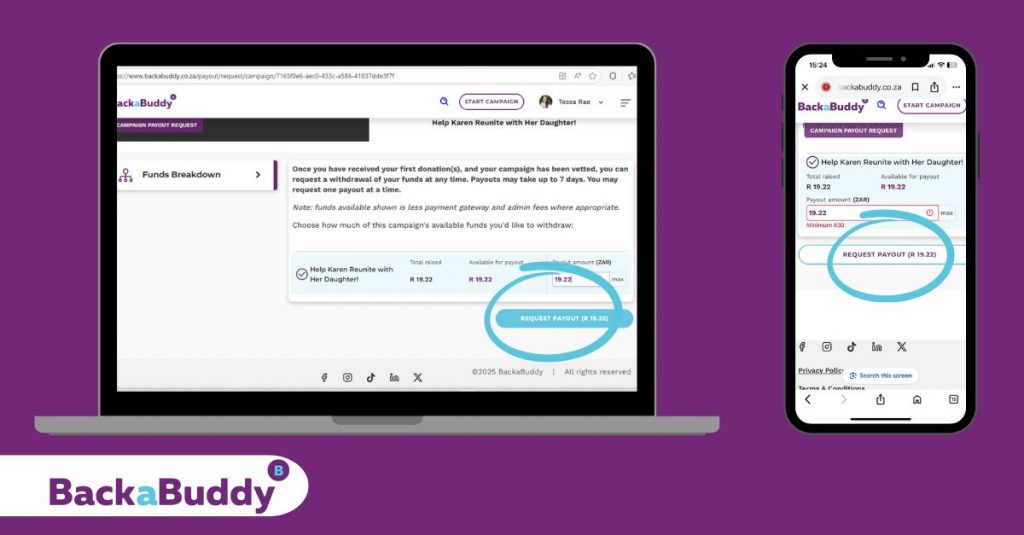
6. On the left, select the purple “Payout Request” button.
7.
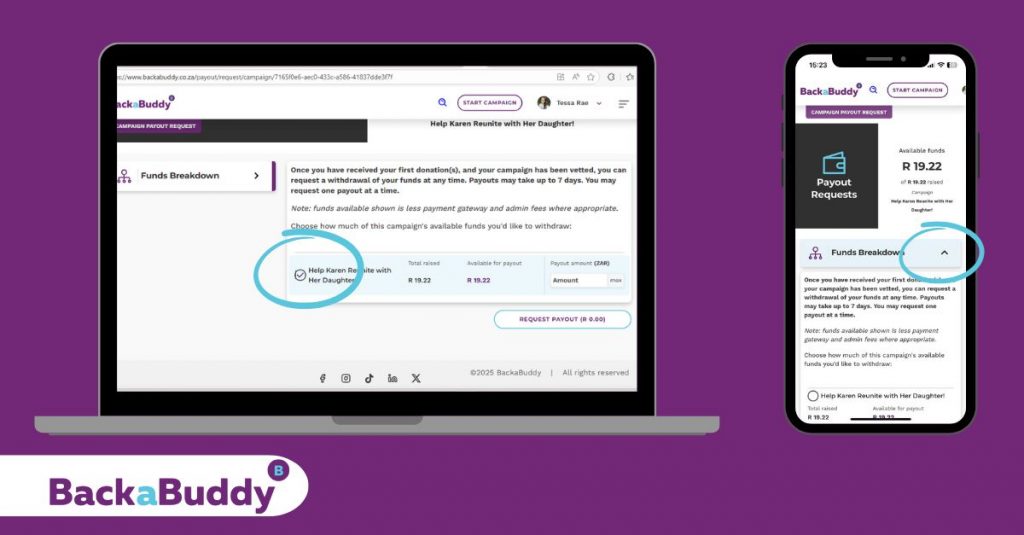
PC View: Tick the small circle next to your campaign’s name in the summary.
Mobile View: Click on “Funds Breakdown” dropdown arrow and then tick the small circle next to your campaign’s name in the summary.
8. Enter the amount you wish to withdraw in the “Payout Amount” box.
9. Click “Request Payout”.
The Payout Journey Splits Here
A. Blue-Tick Campaigns
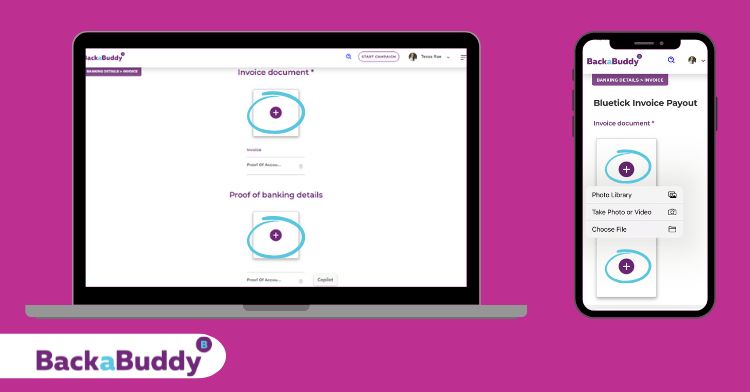
10. You’ll be prompted to upload supporting documents. Choose one of the following:
Invoice: If you have an invoice from the organisation you need to pay.
Or a Reimbursement Claim: If you’ve already paid and are claiming back, upload your proof of payment. You’ll also need to upload your proof of banking details.
Organisation’s proof of Banking Details: If the payment is to an organisation’s bank account (the usual option). You can upload the same invoice if the banking details are clearly displayed.
Tip: If PDF uploads fail (usually due to file size), take a screenshot and upload the image instead!
11.Upload your document(s) by clicking the “+” in the square boxes. (One document per block.)
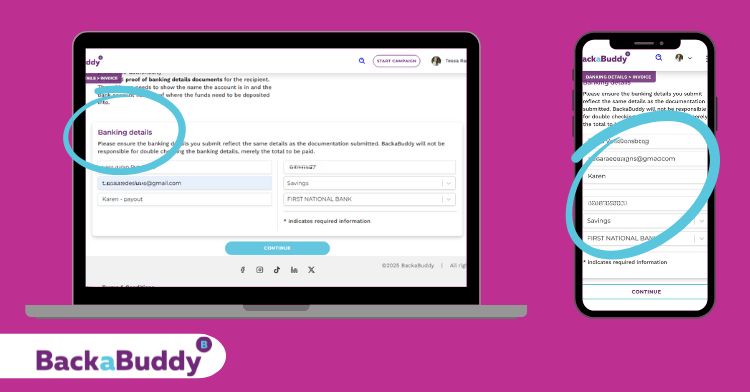
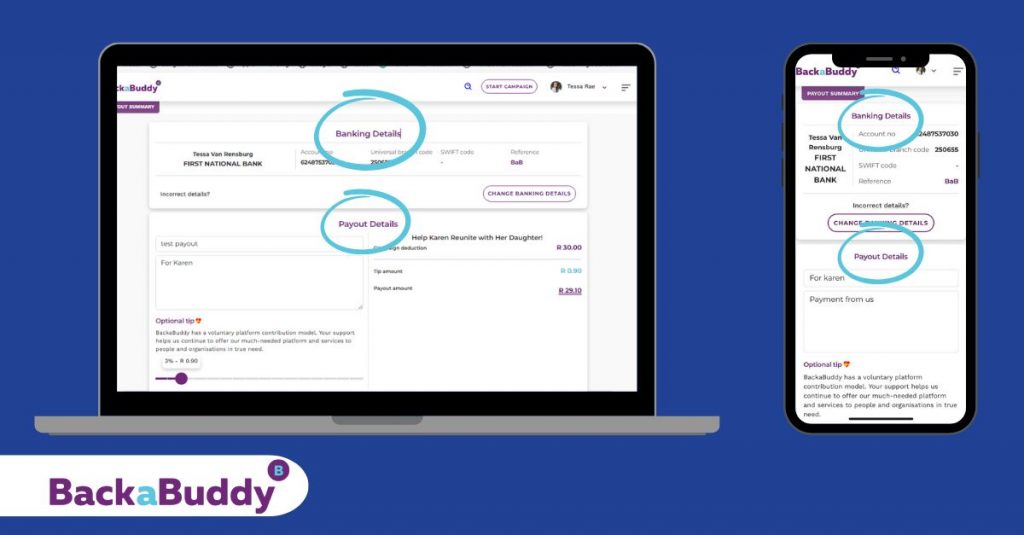
12.Enter the organisation’s bank account details—make sure these match your uploaded proof or the details on the invoice.
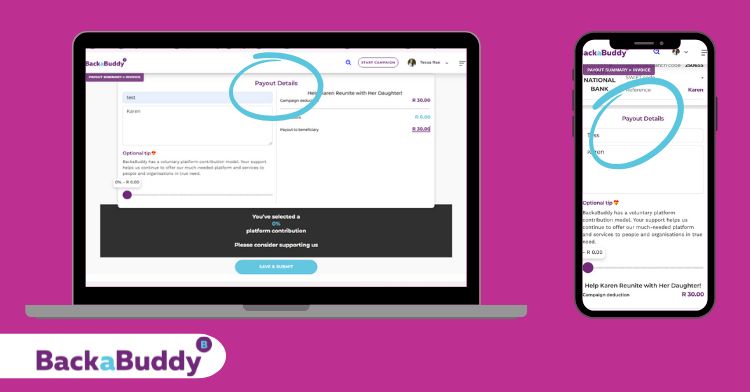
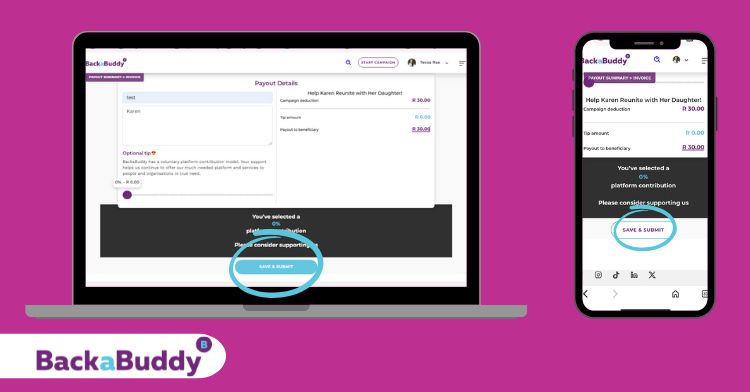
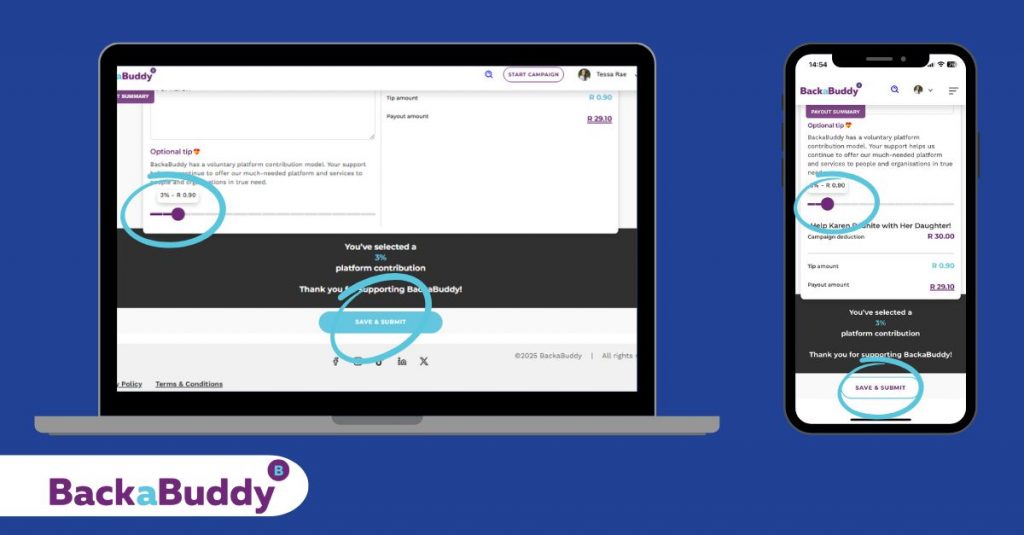
13.Leave a tip for BackaBuddy (optional).
14. Click “Save and Submit” at the bottom.
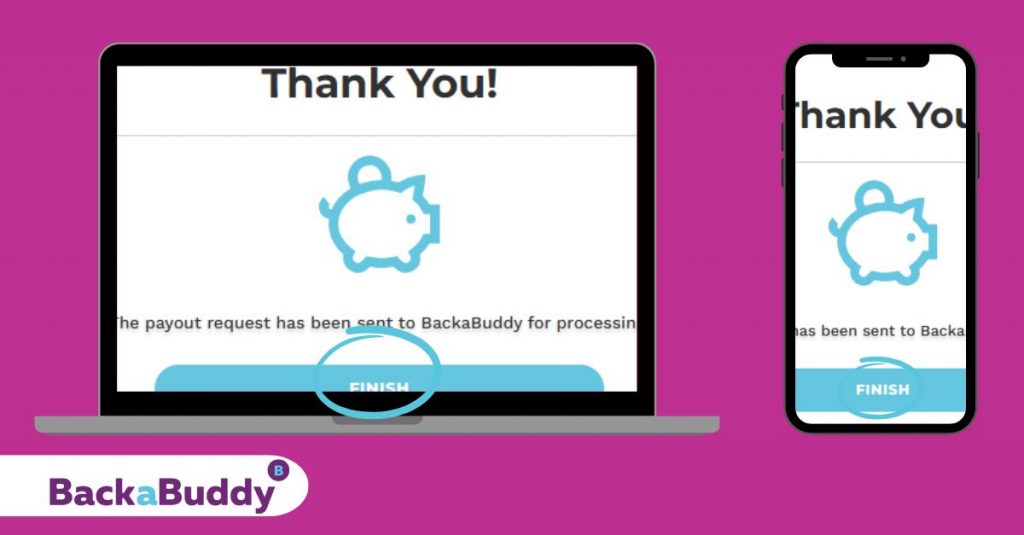
15. If completed successfully, a small pop-up will confirm your payout request has been sent for processing. Click “Finish” to complete.
B. Self-Managed Campaigns
Funds are paid into the campaign creator’s bank account or beneficiary of choosing (as uploaded and verified during campaign setup).
10. After clicking “Request payout”, complete the payout form: add a clear title and description, and double-check the banking details.
11. (Optional) Add a tip.
12. Click “Save & Submit.”
13. A confirmation pop-up will confirm your payout request was sent for processing. Click “Finish” to complete.
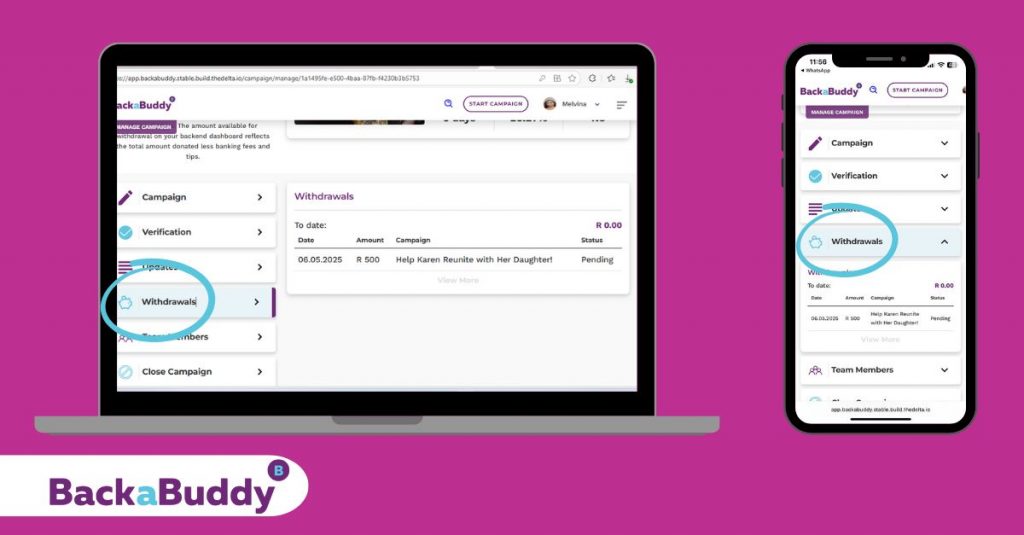
Tracking Your Payout Request
Once you’ve submitted your payout request, you can track its progress right in your dashboard:
Navigate to “Withdrawals” from your menu.
For both Blue Tick and Self-Managed campaigns, you will see the status of your payout request.
If your payout has been successfully processed and is waiting to be paid, the status will show as “Pending”.
Once the payout has been made, the status will update to “Paid”.
Checking the “Withdrawals” section is the quickest way to confirm your payout’s status without needing to contact support.
Important Notes
Processing Time: Payouts usually take 3 to 10 business days to process.
Proof of Payment: If you need a proof of payment, please contact the BackaBuddy team.
International Payouts: For international bank accounts, contact the team to complete the “International Payout” form. (International payouts may take a bit longer.)
For Blue Tick Campaigns: Funds must be paid directly to the organisation’s bank account (except in the case of reimbursements, which require valid proof).
Troubleshooting
If the “Payout Amount” box doesn’t work:
Refresh your browser.
Double-check there are no spaces before or after the amount.
Ensure Num Lock is off.
Try a different device.
If PDFs don’t upload:
Try taking a screenshot and uploading as an image.
Increase your campaign’s success by adding team members! This guide explains how to add collaborators to your campaign, making it easier to reach your fundraising goals together.
Steps to Add Team Members:
Log in and go to “My Campaigns.”
Select your campaign, click “Manage Campaign,” and navigate to “Team Members.”
Add up to two team members to assist with your campaign.
Watch Our Step-by-Step Guide on YouTube
Contact Us:
For any questions, reach out to your campaign manager for personalised assistance, alternatively contact us, HERE.
Want impact stories and top crowdfunding tips? Sign up for our newsletter and join our community!
Learn how to activate the Donate button on your BackaBuddy campaign, ensuring it’s ready to receive donations from supporters. A quick and simple step, activating the Donate button allows you to start fundraising effectively.
Steps to Activate the Donate Button:
Log in to your profile and access your campaign.
Click on “Manage Campaign.”
Scroll down and hit “Launch” to activate the Donate button.
Make sure your campaign details are complete and appealing before activating your Donate button—first impressions are powerful.
Keeping your campaign fresh and engaging is key to reaching your goals. This guide will help you manage and edit your BackaBuddy campaign by updating your story, adding team members, and posting updates to stay connected with supporters.
Steps to Edit Your Campaign:
Log in to your profile and select “My Campaigns.”
Choose the campaign you wish to edit.
Update details, images, or add team members as needed.
Share updates on any milestones or news related to your campaign—it helps donors feel involved in your journey!